Hello folks, it's been a while but I've not been idle as some of you may be aware.
I'm currently looking at adding cab lights to the Kuju Deltic as part of a wider package of upgrades to overhaul the old girl. I've had helpful links from Mr Gillam but even that wasn't in basic enough terms for me.
I want to make a custom light object myself, not an actual visible bulb, just a light source to be added as a child and manipulated around - does this need to have a mesh of any sort as I am just interested in generating light and not seeing an object it actually comes from?
If I do need an object, what (if any) textures/shaders do I need to use?
Help decoding the tech speak on the pointlight Blueprint would be greatly appreciated too as it baffled me a bit.
TrainSimDev.com
A community for train simulator content developers. Create, support, share, respect!
Basic interior light
9 posts
• Page 1 of 1
Re: Basic interior light
![]() by cjbarnes5294 » Mon Feb 23, 2015 3:31 am
by cjbarnes5294 » Mon Feb 23, 2015 3:31 am
Hi Matt,
You don't actually need a mesh object tied to the light blueprint - it's usually just to make the light child object visible and grab-able in the editor.
Instead of using a point light, which radiates light in all directions and therefore has a greater impact on game performance, even with shadow casting turned off and a PC with some nice kit, I would recommend creating a spot light instead. In the blueprint editor, the blueprint you're looking for when adding a new item is "Spot light blueprint". Give it a name at the top of the blueprint, and you needn't bother filling out the display name fields unless you want to be able to place the light in the route/scenario editor, so I would set the category to "Exclude from browser list". Skip past the Render Component tab and jump straight to the Light Component cab. The radius is simply the distance in metres from the spot light that the emitted light reaches. Phi and Theta take a bit more getting your head around, but then it's easy to understand what they're doing once you've got it.
If you think of a point light, which casts in all directions, as a pie, and the radius of the pie is the value set by the field Radius, then a spot light with the same radius is basically a slice of that pie. Phi is the angle in degrees between the two cuts to form the slice, so if you set Phi to 90, you'd get a quarter pie slice. If you set it to 180, the slice would be half of the pie, and so on and so forth. Theta is a secondary angle that is either equal to or smaller than Phi, and is used to create a light fade gradient between Theta and Phi. So for example, if Theta is the same as Phi, you'd get a hard edge to the sides of the beam of light. If Theta was half of Phi, then the portion of the light beam inside of the angle Theta would be full intensity, and then fade out to nothing towards Phi, giving a soft edge to the light beam.
Edit 07/07/16: Some of the info about the angles above is incorrect, see my later post below. However, the principle still holds.
The Colour field is pretty straight forward, and according to Derek Siddle, alpha wasn't used back in TS2012 - I don't know if it matters now, though. It might be worth setting to 1, just in case. Tick Cast Shadows if you want shadows, which you probably do for a cab light designed to be viewed from the outside. Make sure Day night cycle is unticked, and you can leave Anim and Projected texture fields blank.
Once you've created the light object and exported it, you can just add it to the deltics like any old child object, and move it into position. However, unlike particle blueprints, which let you determine the direction of emission to save you have to rotate the particle emitters themselves, you can only rotate spot light child objects to change the light direction unfortunately. By default, they point straight along the positive z-axis of the loco they're added to (length-ways, towards the front), so you need to rotate it 90 degrees around the x-axis to point down at the ground , so that you can stick it up into the cab ceiling (useful link: http://forums.uktrainsim.com/viewtopic. ... n#p1549720).
Since you want the light to cover as much of the cab as possible, I would probably set Phi to 180, and then you can play with the radius/range and Theta values to find something you like.
Chris
Last edited by cjbarnes5294 on Thu Jul 07, 2016 1:19 am, edited 1 time in total.
The Red Queen Hypothesis, applicable to train sim development?
"Here, you see, it takes all of the running you can do, to keep the same place."
"Here, you see, it takes all of the running you can do, to keep the same place."
- cjbarnes5294
- Driver
- Posts: 398
- Images: 82
- Joined: Mon Mar 31, 2014 12:40 pm
- Location: Gloucestershire/North Yorkshire
- Has thanked: 551 times
- Been thanked: 187 times
Re: Basic interior light
![]() by deltic009 » Mon Feb 23, 2015 5:33 am
by deltic009 » Mon Feb 23, 2015 5:33 am
WOW, fantastic guide/help as always. I'll look at other loco configs to see about keymappers and attaching the lights to those commands when I get my light created, but you've broken down the speak very well for me, so thanks for that.
- deltic009
- Full Time Fireman
- Posts: 62
- Joined: Mon Apr 14, 2014 12:52 pm
- Has thanked: 16 times
- Been thanked: 34 times
Re: Basic interior light
![]() by cjbarnes5294 » Mon Feb 23, 2015 9:39 pm
by cjbarnes5294 » Mon Feb 23, 2015 9:39 pm
No problem Matt. I hoped the pie analogy wasn't going to be read as condescending, but I think it explains the lights quite nicely, so I'm glad it's helped. Give us a shout if you need any more help.
Chris
Chris
The Red Queen Hypothesis, applicable to train sim development?
"Here, you see, it takes all of the running you can do, to keep the same place."
"Here, you see, it takes all of the running you can do, to keep the same place."
- cjbarnes5294
- Driver
- Posts: 398
- Images: 82
- Joined: Mon Mar 31, 2014 12:40 pm
- Location: Gloucestershire/North Yorkshire
- Has thanked: 551 times
- Been thanked: 187 times
Re: Basic interior light
![]() by deltic009 » Mon Feb 23, 2015 10:47 pm
by deltic009 » Mon Feb 23, 2015 10:47 pm
It is a good explanation, I was wondering if you could work such wonders (or anyone else) in explaining how to understand the relationship between the inputmappers, control/switches defined in the loco config and the child object for the light all work together and are input respectively to make it all work that would be great.
- deltic009
- Full Time Fireman
- Posts: 62
- Joined: Mon Apr 14, 2014 12:52 pm
- Has thanked: 16 times
- Been thanked: 34 times
Re: Basic interior light
![]() by deltic009 » Wed Feb 25, 2015 3:40 am
by deltic009 » Wed Feb 25, 2015 3:40 am
Right, I have a light in each cab now so that's one job completed, currently they work on the day/night cycle trigger.
I'm aware that it is tricky without access or permission to distribute source files, but I would like the lights to be controlled by keyboard commands so that the player controls them.
I'm probably asking too much, and it won't be the end of the world, but one can dream eh?
I'm aware that it is tricky without access or permission to distribute source files, but I would like the lights to be controlled by keyboard commands so that the player controls them.
I'm probably asking too much, and it won't be the end of the world, but one can dream eh?
- deltic009
- Full Time Fireman
- Posts: 62
- Joined: Mon Apr 14, 2014 12:52 pm
- Has thanked: 16 times
- Been thanked: 34 times
Re: Basic interior light
![]() by TrabantDeLuxe » Wed Jul 06, 2016 4:40 pm
by TrabantDeLuxe » Wed Jul 06, 2016 4:40 pm
Hijacking the topic here, I've done interior lighting. As a comparison, let's start of with a interior that simply uses the tex shader

As expected, we get very even lighting. This can certainly be used to ones' advantage, for example in well-lit modern rolling stock. I don't really like how the curtains behave though. Another carriage I made uses spotlights to illuminate the interior, using the spot light blueprint, added as a child object to the wagon blueprint. The important blueprint bits are:
I found that a soft yellowish colour gives the effect I want. There seems to be a relation between the beam angle (phi and theta, see Chris' post), and the light intensity. At angles higher than 90 degrees the light intensity was rather low.

Using a single spotlight we've got this. I would like to have a more intense light, but that seems to be rather difficult when also keeping the light radius smaller than the compartment size.
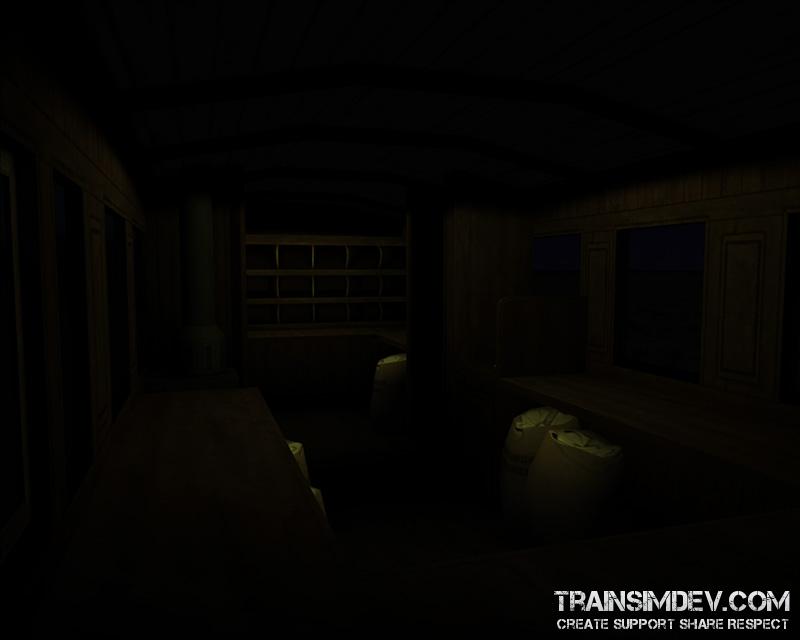
Two lights have been used to light this bit. Once again, I would have liked a bit more intensity, but this is way better than using the tex shader. I haven't really noticed any performance issues with these lights. I do feel that for rolling stock intended to be used in a single train, one should pick one lighting method, and apply it to all vehicles as to keep a consistent look and feel.
As expected, we get very even lighting. This can certainly be used to ones' advantage, for example in well-lit modern rolling stock. I don't really like how the curtains behave though. Another carriage I made uses spotlights to illuminate the interior, using the spot light blueprint, added as a child object to the wagon blueprint. The important blueprint bits are:
- Radius = 2,2 m
- Phi = 85 degrees
- Theta = 80 degrees
- Shadow casting is turned off. Note that this means that light will shine through walls, so be careful in positioning the lights. Also, keep the radius smaller than the compartment size - otherwise you'll light up bits and pieces outside the compartment
I found that a soft yellowish colour gives the effect I want. There seems to be a relation between the beam angle (phi and theta, see Chris' post), and the light intensity. At angles higher than 90 degrees the light intensity was rather low.
Using a single spotlight we've got this. I would like to have a more intense light, but that seems to be rather difficult when also keeping the light radius smaller than the compartment size.
Two lights have been used to light this bit. Once again, I would have liked a bit more intensity, but this is way better than using the tex shader. I haven't really noticed any performance issues with these lights. I do feel that for rolling stock intended to be used in a single train, one should pick one lighting method, and apply it to all vehicles as to keep a consistent look and feel.
- TrabantDeLuxe
- Passed Fireman
- Posts: 247
- Images: 7
- Joined: Mon Mar 21, 2016 10:10 pm
- Location: Delft, NL
- Has thanked: 176 times
- Been thanked: 263 times
Re: Basic interior light
![]() by cjbarnes5294 » Thu Jul 07, 2016 1:18 am
by cjbarnes5294 » Thu Jul 07, 2016 1:18 am
As this thread has re-emerged, I think that it's worth correcting some of the information in my post above, which I have since learnt was not quite right.
My findings are that the maximum angle for Phi is 90 degrees, and you're probably thinking, but I want more than a quarter pie? It turns out it isn't a quarter, it's half. That's because the angle is actually between the light beam centre-line, the line along which the spot light is pointing, and the edge of the light cone, rather than the angle between the two edges of the cone. No doubt, Theta is the same. When I tried to create an angle greater than 90 for Phi, the light refused to render at all, so whilst I wasn't trying to create one, I suppose that using the pie analogy, you can't make a Pac-man shaped pie, the most you can have is half. Those are my findings anyway.
Kind regards,
Chris
My findings are that the maximum angle for Phi is 90 degrees, and you're probably thinking, but I want more than a quarter pie?
Kind regards,
Chris
The Red Queen Hypothesis, applicable to train sim development?
"Here, you see, it takes all of the running you can do, to keep the same place."
"Here, you see, it takes all of the running you can do, to keep the same place."
- cjbarnes5294
- Driver
- Posts: 398
- Images: 82
- Joined: Mon Mar 31, 2014 12:40 pm
- Location: Gloucestershire/North Yorkshire
- Has thanked: 551 times
- Been thanked: 187 times
Re: Basic interior light
![]() by TrabantDeLuxe » Thu Jul 07, 2016 2:51 pm
by TrabantDeLuxe » Thu Jul 07, 2016 2:51 pm
And I completely forgot to add the same conclusion to my post. We're indeed talking half-angles, with a maximum of 90 degrees. If phi is greater than 90, the light will simply refuse to render.
- TrabantDeLuxe
- Passed Fireman
- Posts: 247
- Images: 7
- Joined: Mon Mar 21, 2016 10:10 pm
- Location: Delft, NL
- Has thanked: 176 times
- Been thanked: 263 times
9 posts
• Page 1 of 1
Who is online
Users browsing this forum: No registered users and 0 guests